
This mini crochet baseball was one of those projects that made more sense in my hands than it did in my head at first. It is not made like a simple round amigurumi ball. Instead, the baseball shape comes from two white panels that are joined together with red yarn.
What I like about this pattern is that the red seam is not just decoration at the end. It actually helps close the baseball while also creating that classic baseball look. Once I understood that, the whole project felt much less confusing.
The white pieces are fairly simple to crochet, but the joining step is the part I would slow down for. It takes a little patience to match the edges, add the stuffing at the right time, and keep the red seam from pulling too tightly.
In this pattern, I will walk through how I make the two white baseball panels first, then how I use red yarn to join them into a small stuffed baseball.
Follow the Baseball Shape Before Reading the Pattern
This mini baseball can feel a little confusing if you only read the written steps first. The white panels are simple on their own, but the red seam is doing two things at the same time: it joins the pieces together and creates the baseball stitching.
In the video, I show how I hold the two white panels together, where I start the red yarn, how I work along the side edges, and when I stop to add the stuffing. I think this is the part that makes the most sense when you can actually see the pieces in my hands.
You can watch the video once before starting, then use the written pattern below as your step-by-step checklist while you crochet.
Mini Crochet Baseball Pattern for Beginners
Before We Start the Pattern
Before the round-by-round part, I like to keep one picture in mind: this baseball is made from two matching white panels. Each panel has two round ends and a narrow middle strip. After both panels are finished, the red yarn joins them together and becomes the baseball seam.
What I Used
- A smooth 4-ply yarn
- A 2.0 mm crochet hook
- White yarn for the baseball body
- Red yarn for the baseball seam
- Fiberfill stuffing
- A yarn needle
- Scissors
- A stitch marker, optional but helpful for beginners
If you are using a different yarn, that is okay too. I would just try to choose something smooth rather than fuzzy, because this project looks cleaner when the stitches are easy to see.
Before You Start
This pattern uses a few basic crochet stitches:
- chain = the small starting stitch
- slip stitch = used to close a round
- single crochet = a short, tight stitch
- double crochet = a taller stitch
I will still use the usual short forms below, but I’ll explain them in plain language too:
- ch = chain
- sl st = slip stitch
- sc = single crochet
- dc = double crochet
One important note:
When I say “chain 2 at the beginning of the round”, those 2 chains do not count as a stitch in this pattern.
A Quick Picture of How This Pattern Works
You will make:
- 2 identical white baseball panels
Each panel is made like this:
- Make one round white piece
- Crochet a small strip that is 6 stitches wide
- Make another round white piece
- Sew that second round piece to the strip
After that, you will have one long curved baseball panel.
Then you make a second one exactly the same way.
Finally, you use red yarn to join the 2 white panels together. That red join becomes the baseball seam.
Part 1: Make the First White Baseball Panel
Step 1: Make the First Round Piece
Start with white yarn.
Round 1
- Make a magic ring
- Chain 2
(These 2 chains do not count as a stitch.) - Work 12 double crochets into the ring
- If you are a beginner, place a stitch marker in the first real double crochet
- Pull the magic ring tight
- Make 1 slip stitch into the first double crochet to close the round
You now have 12 double crochets.
Round 2
- Chain 2
(Again, this does not count as a stitch.) - In the same place, work 2 double crochets
- Then work 2 double crochets in every stitch around
- You will do this 12 times total
- At the end of the round, you will have 24 double crochets
- Make 1 slip stitch into the first double crochet to close the round
Now the round white piece is finished.
Step 2: Crochet the Narrow Middle Section
Without cutting the yarn, keep working from that round piece.
Row 1
- Chain 1
- In the same place, make 1 single crochet
- Continue making single crochets in order until you have 6 single crochets total
That finishes Row 1.
Rows 2 to 7
- Chain 1 and turn
- Work 6 single crochets
- Repeat this for each row
- Do not add any stitches
- Do not reduce any stitches
When you finish, you should have 7 rows total, and each row has 6 single crochets.
This makes the narrow connecting section in the middle of the baseball panel.
After Row 7:
- Chain 1
- Cut the yarn
- Leave a tail about 15 cm / 6 inches long
Step 3: Make the Second Round Piece
Now make another white round piece exactly the same way as the first round piece: magic ring, chain 2, 12 double crochets, slip stitch to close, then chain 2 and work 2 double crochets in each stitch around for 24 stitches total.
This second round piece does not need the 7 rows of single crochet. It is only the round end that will be sewn to the narrow strip.
Step 4: Join the Second Round Piece to Finish One Panel
Now you will join the loose round piece to the strip you made earlier.
- Place the two pieces with the wrong sides facing each other
- Match the stitches carefully
- Using a yarn needle, sew through the matching V-shaped top stitches
- Sew 6 matching stitches together, one by one
Take your time here. I like to line up the stitches first before I sew, because it helps the panel stay neat.
When those 6 stitches are sewn together:
- Hide the yarn end inside the piece
Now you have finished one white baseball panel.
It should look like a long curved white shape, with a round end on each side and a narrow section in the middle.
Part 2: Make the Second White Baseball Panel
Now make one more identical panel.
So in total, you will have:
- 2 matching white baseball panels
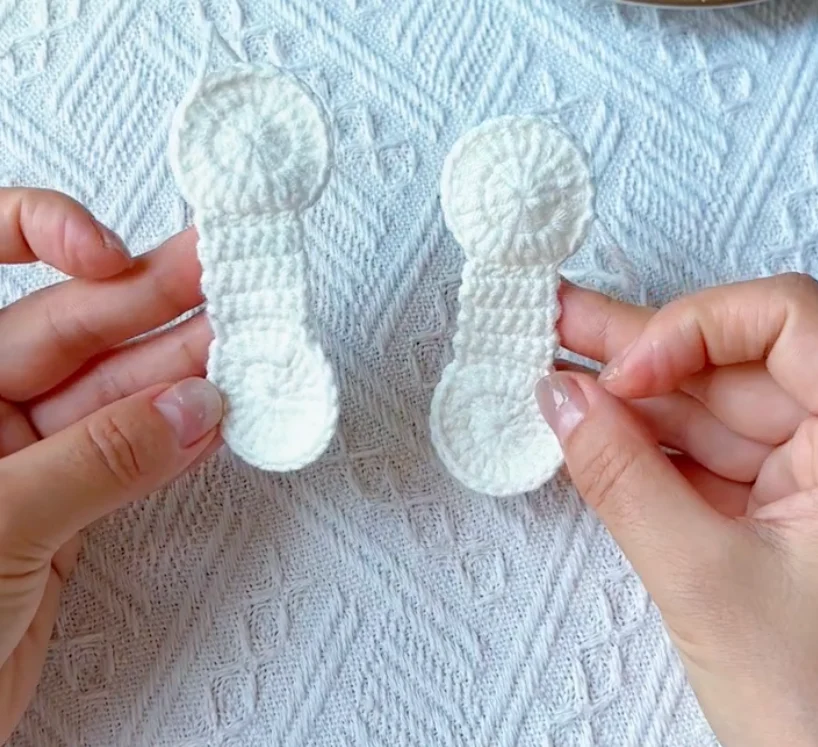
This is the part I would finish before even thinking about the red seam. Once both white pieces are done, the rest feels much easier.
Part 3: Join the Two Panels with Red Yarn
This is the part that makes the baseball really start to look like a baseball. Before starting the red seam, hold the two white panels together and check the direction. The narrow strip on one panel should not sit directly on top of the narrow strip on the other panel. They should be offset so the red seam can curve around the ball like a real baseball seam.
The red yarn does two things at the same time:
- It joins the 2 white panels together
- It creates the red baseball seam
Start with red yarn.
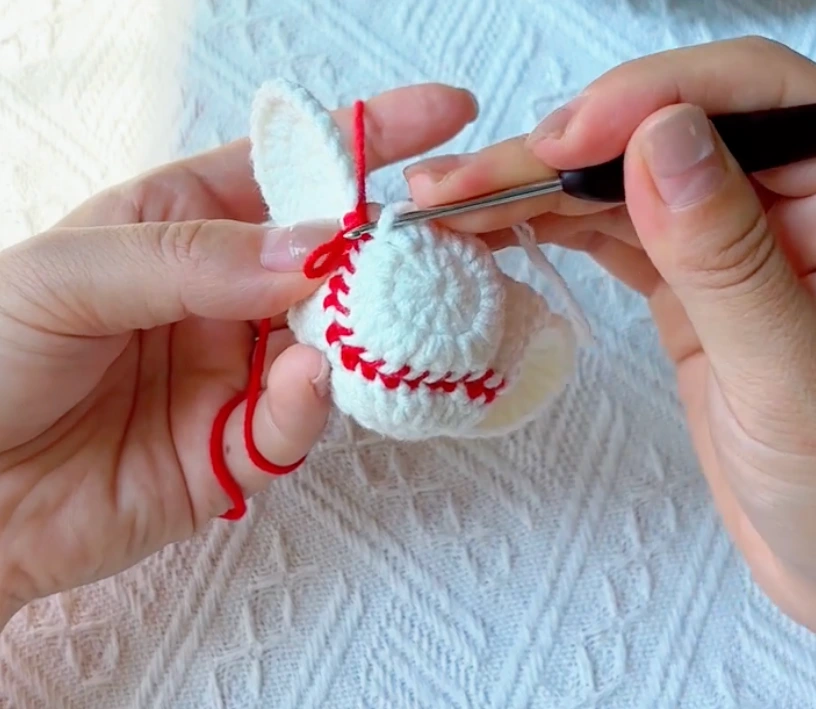
Step 1: Start the Red Join
- Make a starting loop with the red yarn
- Take one white panel
- Insert the hook into the side edge of the first row of single crochet on that panel
- Pull up the red loop
Now take the second white panel.
- Skip the stitch where the single crochet strip meets the round section
- Count forward 6 stitches
- Insert your hook into the 7th stitch
- Hold the two panels close together
- Make 1 single crochet with the red yarn to join them
That is your first joining stitch.
Step 2: Keep Joining Along the Side Edge
Now repeat the same idea:
- Pull the loop slightly larger if needed
- Insert the hook into the side edge of Row 2 of the single crochet strip on the first panel
- Pull up the loop
- Insert the hook into the next stitch on the second panel
- Make 1 single crochet
Repeat this same joining method along the strip.
You are matching:
- the side edges of the 6 single crochet rows
with - the stitches on the other panel
Keep doing this until you have made 6 joining stitches in this section.
This finishes the first group of 6 red joining stitches.
Step 3: Move to the Next Curved Section
After that first group of 6 joining stitches:
- Pull the loop slightly larger again
- Skip the little joining point where the strip meets the round section
- Insert the hook into the next stitch
- Insert the hook into the matching stitch on the other panel
- Make 1 single crochet
Continue making 6 joining single crochets in this next section.
This gives you the second group of 6 joining stitches.
Step 4: Join the Other Side of the Strip
Next, you will come to the strip section on the left side.
Now you will again work through:
- the side edges of the single crochet rows
- and the matching stitches on the other panel
Make 6 more joining single crochets.
At this point, you are repeating the same basic idea around the baseball:
- join a strip section
- join a curved section
- join the other strip section
- keep going around
I would not worry too much if this feels abstract at first. The shape becomes much clearer after a few sections are joined.
Step 5: Keep Going Around the Baseball
Continue joining all the way around using the same red single crochet seam.
As you work, the baseball will slowly close up and become three-dimensional.
Try not to pull the red seam too tightly. I like to keep it firm, but not overly tight, so the baseball stays round instead of becoming squeezed.
Part 4: Add Stuffing and Close the Baseball
When you are almost finished and only one last group of 6 joining stitches is left open:
- Stop and add the fiberfill stuffing
- Add the stuffing little by little
- Shape the baseball gently with your hands
Once it feels full enough:
- Continue the last section of the red joining seam
- Finish the final joining stitches
Then:
- Chain 1
- Cut the red yarn
- Thread the yarn end onto a needle
- Hide the end inside the baseball
And that’s it — your crochet baseball is finished.
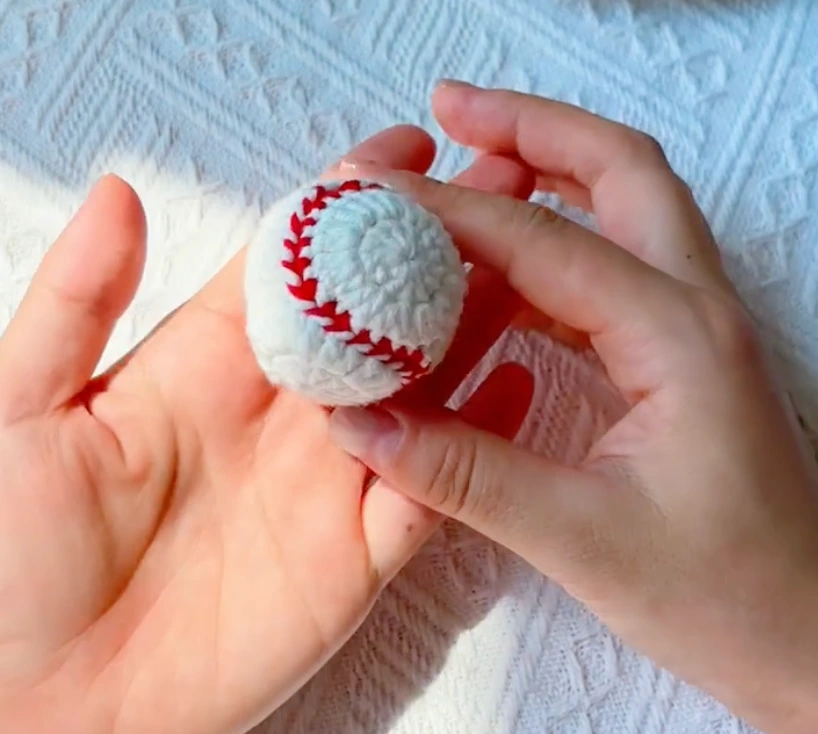
Little Things That Helped Me
If the shape looks strange before stuffing
That is normal. Before the stuffing goes in, the baseball can look a little floppy or uneven. Mine usually looks much better after I fill it and gently shape it with my hands.
If the red seam feels confusing
I think it helps to remember this:
you are not decorating afterward.
You are using the red yarn to join the two white panels together. The seam is the structure and the decoration at the same time.
If your stitches do not line up perfectly
Do not worry too much. A handmade baseball does not need to look machine-perfect. As long as the shape is round and the red seam flows nicely around the ball, it will still read clearly as a baseball.
If you are a beginner
I would finish both white panels first, lay them in your hands, and look at the shape before starting the red join. That makes the whole project feel much less confusing.
Where I Would Go After This Baseball
If this mini baseball felt a little tricky, I would not take that as a bad sign. This project asks you to do more than just crochet a round ball. You are making two shaped panels, matching the edges, using the red yarn as both a seam and a detail, and stuffing the shape before it closes. That is a lot for one small project.
If you want another sports-themed ball, the crochet volleyball keychain is a nice one to try. It still gives you that small sporty look, but the construction feels different from this baseball.
If you want another small ball where the surface detail changes everything, try my mini crochet basketball pattern. It starts as a simple orange ball, then becomes a basketball after the black lines are sewn on.
If you want something more patient and puzzle-like, the mini crochet soccer ball pattern is a good next challenge because it is built from many small pieces.
And if the starting round or the basic stitches felt like the hardest part, I would go back to the basics for a bit. My single crochet magic ring guide can help with the beginning of small round pieces, and the double crochet for beginners guide is helpful because the white baseball panels use double crochet rounds.