
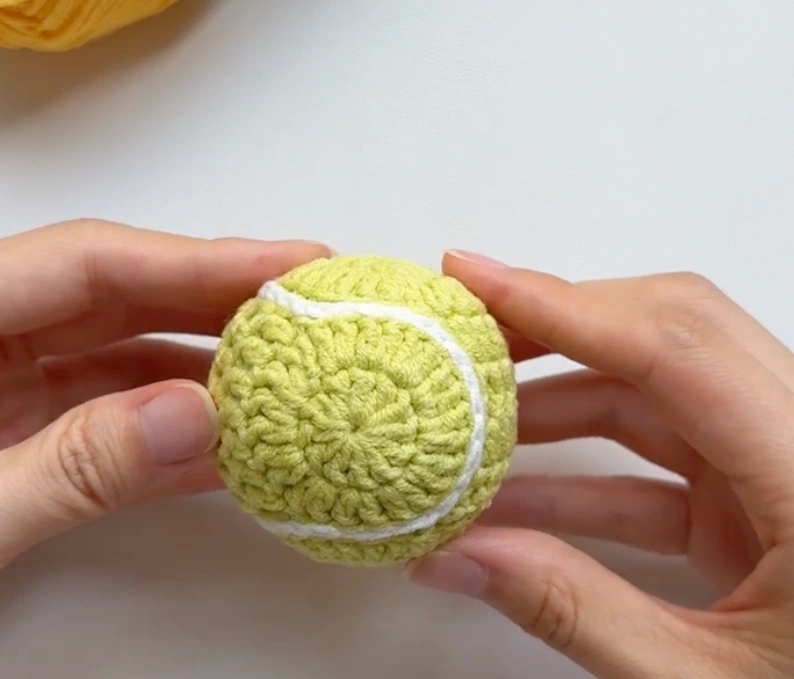
This mini crochet tennis ball is one of those projects that looks a little odd while you are making it, but starts to make sense once the two panels come together. It is not crocheted as one simple round ball. Instead, the shape comes from two curved panels that are joined and stuffed at the end.
When I first made this kind of ball, the flat pieces did not look very convincing by themselves. They looked more like small white or green strips with round ends. But once I held the two panels together and started joining around the edge, I could finally see the tennis ball shape appearing.
The crochet stitches are not very difficult, but the construction is a little different from a basic amigurumi ball. I would slow down when joining the two panels, because the seam is what gives the tennis ball its curved line and round shape.
In this pattern, I will show how I make the two matching panels first, then how I join them together, add stuffing, and shape the ball into a small tennis ball.
Before the Written Pattern
Before the round-by-round steps, I like to keep one idea in mind: this tennis ball is made from two matching curved panels. Each panel has two round ends and a short middle strip. Once the panels are joined and stuffed, the odd flat shape finally turns into a small ball.
Materials
- Yellow-green yarn for the main tennis ball panels
- White yarn for the seam, optional
- 2.0 mm crochet hook
- Fiberfill stuffing
- Yarn needle
- Scissors
- Stitch marker, optional but helpful
I used a 2.0 mm hook for this version because I wanted the stitches to stay firm after stuffing. If you are still figuring out hook sizes, my crochet hooks for beginners guide may help.
For this kind of small stuffed ball, I would avoid very fuzzy yarn at first. Clear stitches make the panels easier to join neatly. If you are still choosing yarn, you can read my best yarn for crochet beginners guide.
Abbreviations
This pattern uses US crochet terms.
- MR = magic ring
- ch = chain
- sl st = slip stitch
- dc = double crochet
- st / sts = stitch / stitches
- R = round
- Row = worked back and forth, not in a circle
In this pattern, the beginning ch 2 does not count as a stitch.
Most of the round pieces use double crochet. If that stitch still feels new, my double crochet for beginners guide may be helpful before you begin.
How This Tennis Ball Is Built
You will make two matching panels first. Each panel is made from:
- one round circle piece
- one second circle piece with a short 8-stitch-wide strip attached
- the strip sewn to the first circle piece
After you make two of these panels, you will join the panels together with slip stitches and add stuffing before closing the final opening.
The First Round End of the Panel
Use your main tennis ball yarn.
If the magic ring still feels tricky, you may want to review my single crochet magic ring guide before starting the first round piece.
Round 1
- Make a magic ring.
- Ch 2. This is only the starting chain and does not count as a stitch.
- Work 12 dc into the magic ring.
- If you are a beginner, place a stitch marker in the first real dc.
- Pull the magic ring tight.
- Sl st into the first dc to close the round.
You should have 12 dc.
Round 2
- Ch 2. This does not count as a stitch.
- Work 2 dc in the first stitch.
- Work 2 dc in each stitch around.
- At the end of the round, you should have 24 dc.
- Sl st into the first dc to close the round.
Fasten off and pull the yarn tail to the back. Weave in or hide the yarn end.
This first circle piece is finished.
The Second Round End and the Middle Strip
Make another round piece using the same method as Part 1, but this time, do not cut the yarn after Round 2.
After Round 2 is finished and you have joined with a slip stitch, continue directly into the narrow middle strip.
Row 3
- Ch 2. Work 8 dc across the next 8 stitches on the round.
- Work 8 dc in order across the next 8 stitches.
You should have 8 dc in this row.
Rows 4 to 6
- Ch 2 and turn.
- Work 8 dc across.
- Repeat until Row 6 is finished.
Do not increase or decrease in these rows. Each row should stay at 8 dc.
After Row 6:
- Ch 1.
- Fasten off.
- Leave a long yarn tail for sewing.
Closing One Long Curved Panel
Now take the first round piece you made earlier.
The 8 stitches at the end of the strip should match 8 stitches on the first round piece. Line them up carefully before sewing.
- Place the strip edge against the first round piece.
- Match the 8 stitches one by one.
- Use the long yarn tail and a yarn needle to sew the 8 stitches together.
- After sewing, hide the yarn tail on the back side and trim the extra yarn.
Now you have finished one long tennis ball panel. It should have a round end, a narrow middle section, and another round end.
Making the Matching Second Panel
Make one more panel using the same method.
At the end of this step, you should have two matching tennis ball panels.
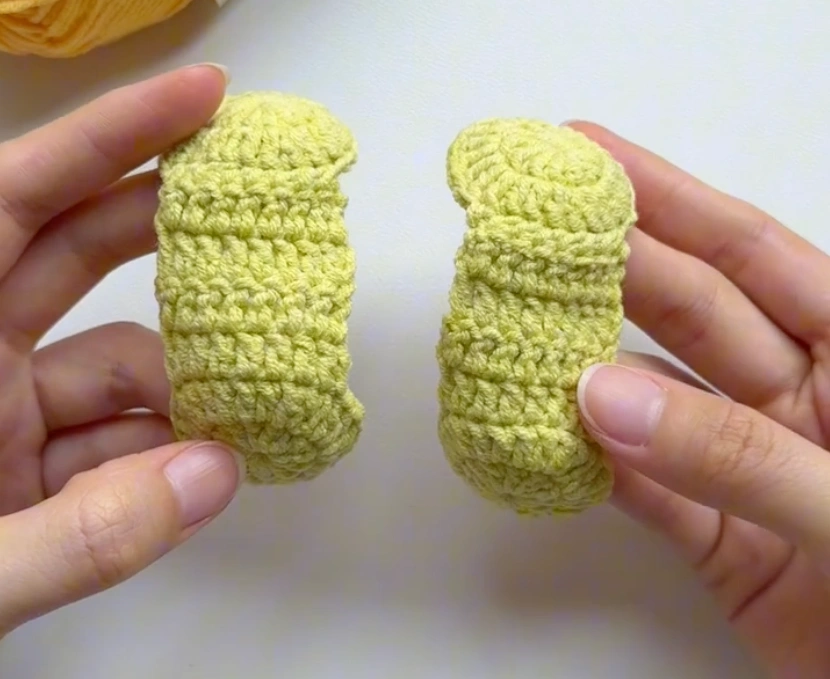
I like to place the two panels next to each other before joining. This makes it easier to see how they will wrap around the ball.
Joining the Two Panels into a Ball
Now you will join the two panels together with slip stitches.
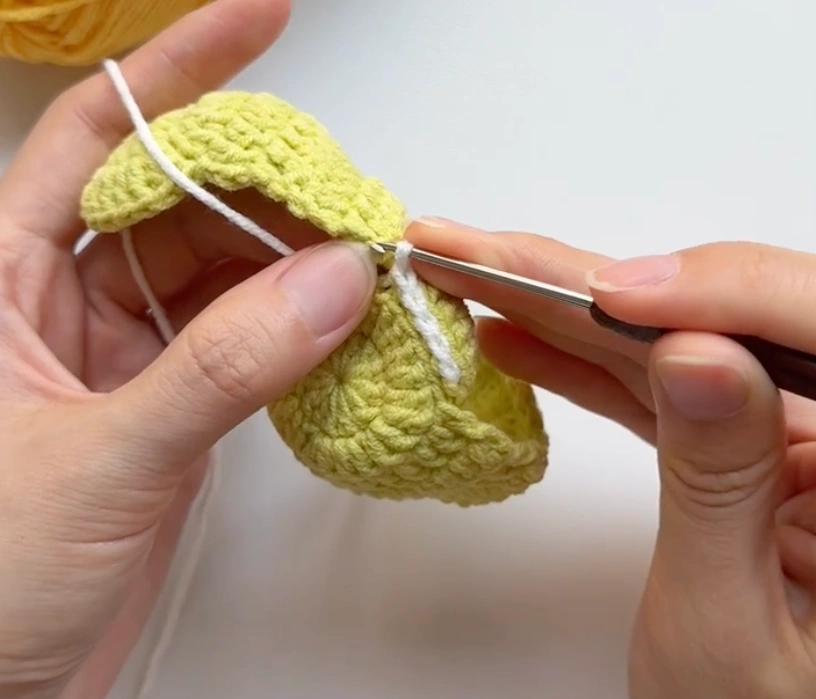
If you want the seam to look like a tennis ball line, use white yarn for this joining step. If your panels are already white, or if you want the seam to blend in, use the same color as the body.
- Hold the two panels together with the right sides facing out.
- Find a comfortable starting point along the edge.
- Insert your hook through the inner loop of one panel and the matching inner loop of the other panel.
- Pull the yarn through from underneath.
- Make a slip stitch to join the two panels together.
- Continue matching the stitches one by one and slip stitch around the edge.
When you work along the side of a double crochet row, the side edge is taller than a normal stitch. I usually treat one double crochet post as about two small joining points. You can pick up one strand or one side loop along the edge as long as the seam stays even.
Try not to pull the joining stitches too tightly. The seam should hold the panels together, but the ball still needs room to become round after stuffing.
Stuffing Before the Last Opening Closes
Keep slip stitching around the edge until only a small opening is left.
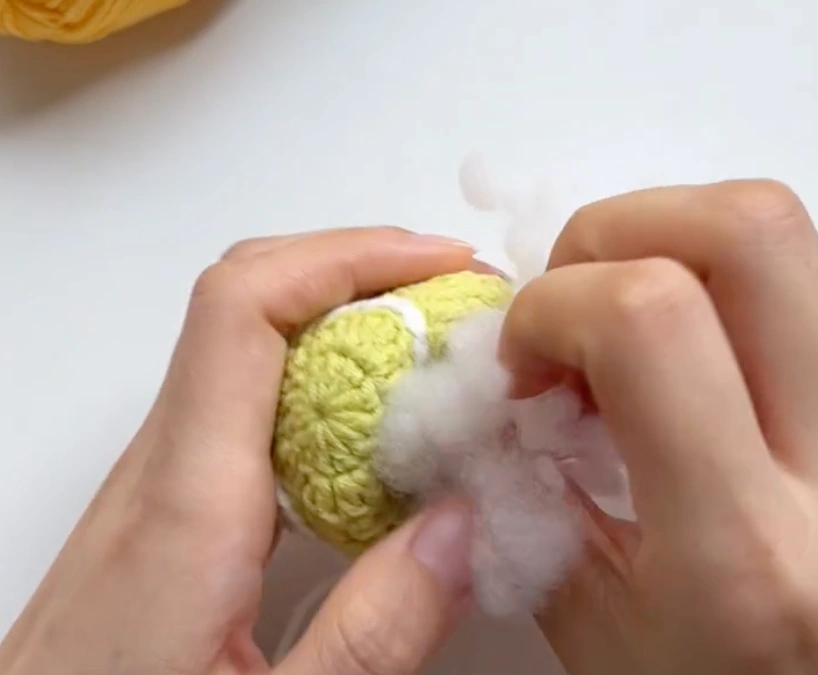
- Add fiberfill stuffing through the opening.
- Stuff the ball firmly, but do not stretch the stitches too much.
- Shape the ball gently with your hands as you add stuffing.
- After stuffing, continue slip stitching until the opening is closed.
When the seam is finished:
- Ch 1.
- Fasten off.
- Hide the yarn end inside the ball.
Your mini crochet tennis ball is finished.
A Few Things That Helped Me
When the Panels Look Strange Before Joining<
That is normal. Each panel does not look like a ball by itself. The shape only starts to make sense after the two panels are joined and stuffed.
When the Seam Feels Too Tight
If the slip stitch seam is pulled too tightly, the tennis ball may look pinched instead of round. I try to keep the join secure but still flexible.
Why Stuffing Changes the Whole Shape
Before stuffing, the ball may look flat or uneven. Once the fiberfill goes in, the panels open up and the tennis ball becomes much rounder.
Adjusting the Seam as You Go
If one part of the seam looks loose, you can tighten it slightly before moving too far ahead. I like to check the shape every few stitches instead of waiting until the whole ball is closed.
After This Little Tennis Ball
If you want another small sports-themed project, my crochet volleyball keychain is a good one to try. It is also a ball-inspired project, but the construction feels different from this tennis ball.
If you enjoy small balls with surface details, you may also like the mini crochet basketball pattern. That one starts as a simple orange ball, and the black lines bring the basketball look in at the end.
For something more puzzle-like, the mini crochet soccer ball pattern is a bigger challenge because it is built from many small black and white pieces.