
I always find Christmas crochet projects extra fun because even a small color change can make the whole piece feel festive. This Santa hat coaster is a good example. At first, it is just a simple round coaster, but as the red, white, and green sections line up, the little hat slowly appears.
What I like about this pattern is that the Santa hat is not sewn on separately. It is made directly into the coaster while you crochet each round. That means you get to practice basic double crochet rounds, simple increases, and a few color changes, all in one small project.
I added the gold details after the coaster was finished, just with a yarn needle and gold thread. They are optional, but they make the coaster feel much more Christmassy without making the crochet part harder.
Below, I will walk through the pattern in a beginner-friendly way, with the color sections explained slowly so you can see how the Santa hat shape comes together round by round.
See How the Santa Hat Appears Round by Round
This coaster looks a little confusing when you only read the color changes on paper, because the Santa hat is not made as a separate piece. It slowly appears as the white, red, and green sections line up from one round to the next.
In the video, I show how I change colors while working the round coaster, where the red hat section begins, and how the white brim is added before the final green edging. Seeing the color placement once makes the written pattern much easier to follow.
You can also see the small finishing details at the end, including the gold thread decoration that gives the coaster a more festive Christmas look.
Materials I Used
- Green yarn for the coaster background
- Red yarn for the Santa hat body
- White yarn for the pom-pom and hat brim
- Gold thread for the small decorative stitches, optional
- 2.5 mm crochet hook
- Stitch marker
- Yarn needle
- Scissors
I used a small cotton yarn with a 2.5 mm crochet hook for this coaster. You do not have to use the exact same yarn, but I would try to keep the green, red, and white yarns close in thickness so the coaster stays flat and the color sections line up nicely. If you are still unsure about hook sizes, my crochet hooks for beginners guide may help.
For this kind of color-change coaster, I would avoid very fuzzy yarn at first. Clearer stitches make it easier to see where each color section begins and ends. If you are choosing yarn for your first few projects, you can also read my best yarn for crochet beginners guide.
Abbreviations
This pattern uses US crochet terms.
- MR = magic ring
- ch = chain
- sl st = slip stitch
- sc = single crochet
- dc = double crochet
- dc inc = double crochet increase, 2 dc in the same stitch
- st / sts = stitch / stitches
- R = round
- skip = skip stitch
Before You Start: How the Santa Hat Appears
This coaster is worked in joined rounds, not continuous rounds. At the end of each round, join with a slip stitch, then make the starting chain for the next round.
In this pattern, ch 1 and ch 2 are used as starting chains and do not count as stitches. When you join the round, join into the first real stitch, not into the chain.
The Santa hat is not made separately and sewn onto the coaster. It appears because we change colors in the same small section of each round.
I like to think of the coaster as having 13 little sections around the circle. Most of those sections stay green, but 2 sections change color to make the hat. The white center becomes the pom-pom, the red rounds become the hat body, and the white section in R5 becomes the brim.
If the shape does not look obvious in the first few rounds, do not worry. Mine also looks more like random color blocks at first. The Santa hat starts to make sense once the red body and white brim are both in place.
Christmas Hat Coaster Pattern
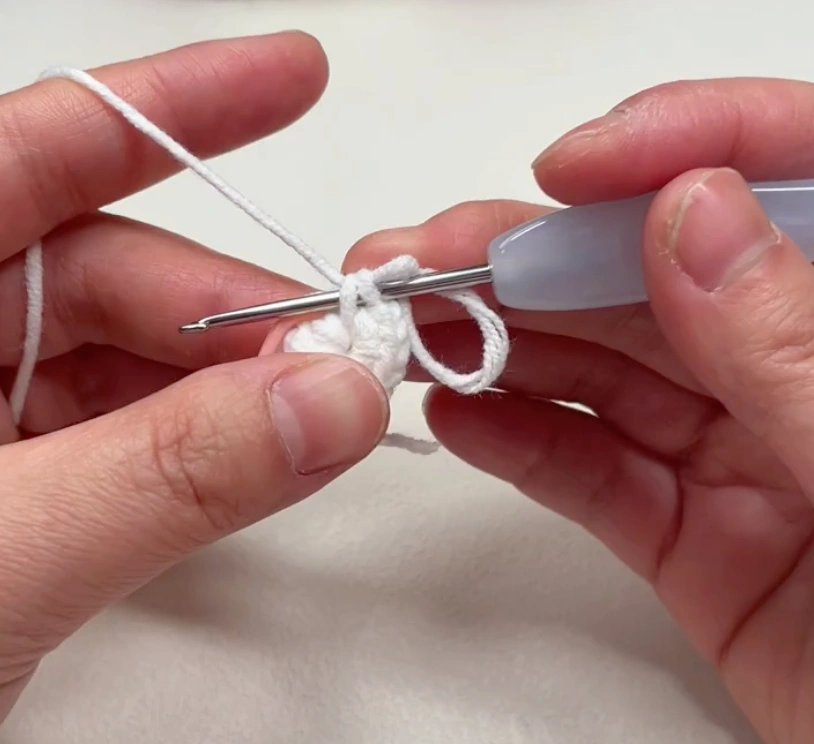
R1: White Center Pom-Pom
Use white yarn.
Make a magic ring.
R1: ch 1, work 13 sc into the magic ring. (13)
Pull the magic ring tight.
Change to green when joining the round. Join with a sl st to the first sc.
The white center will become the small pom-pom at the top of the Santa hat.
For a cleaner color change, start the last stitch in the old color and finish the final pull-through with the new color. This helps the next stitch begin neatly in the new color.
If the magic ring still feels tricky, you may want to review my single crochet magic ring guide before starting. The center of this coaster is small, so a neat magic ring helps the white pom-pom look cleaner.
R2: Green Background and Red Hat Start
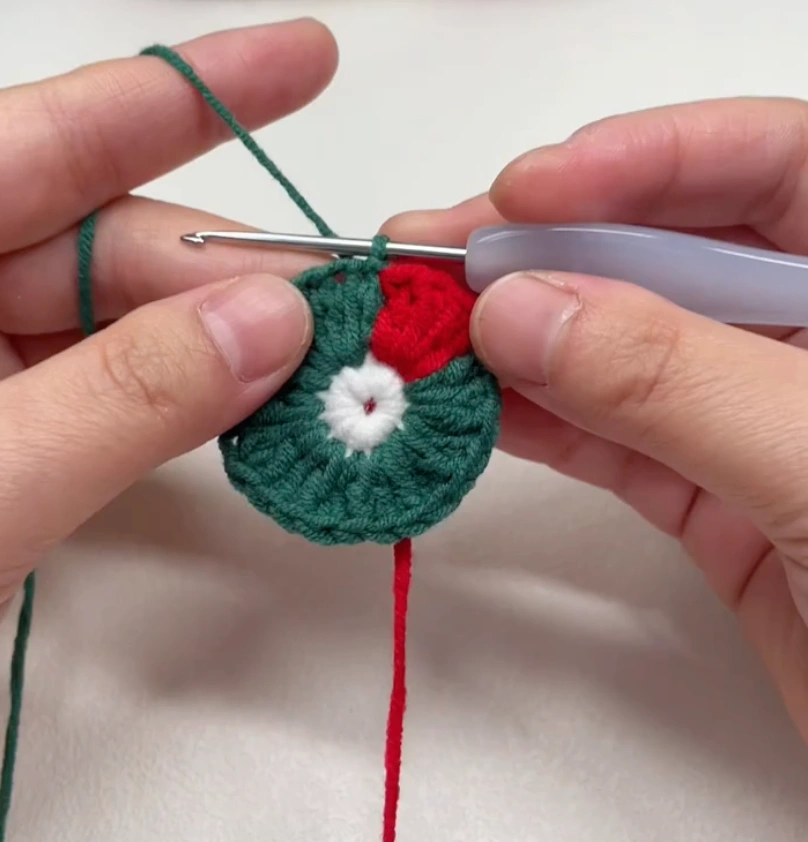
Use green yarn first.
R2: ch 2.
Work the first 11 stitches in green:
- dc inc in each of the next 11 sts.
Now change to red.
Work the last 2 stitches in red:
- dc inc in each of the last 2 sts.
At the end of the round, change back to green when joining.
Join with a sl st to the first dc of the round.
Stitch count: 26
In short:
- Green: dc inc × 11
- Red: dc inc × 2
R3: Continue the Red Hat Shape
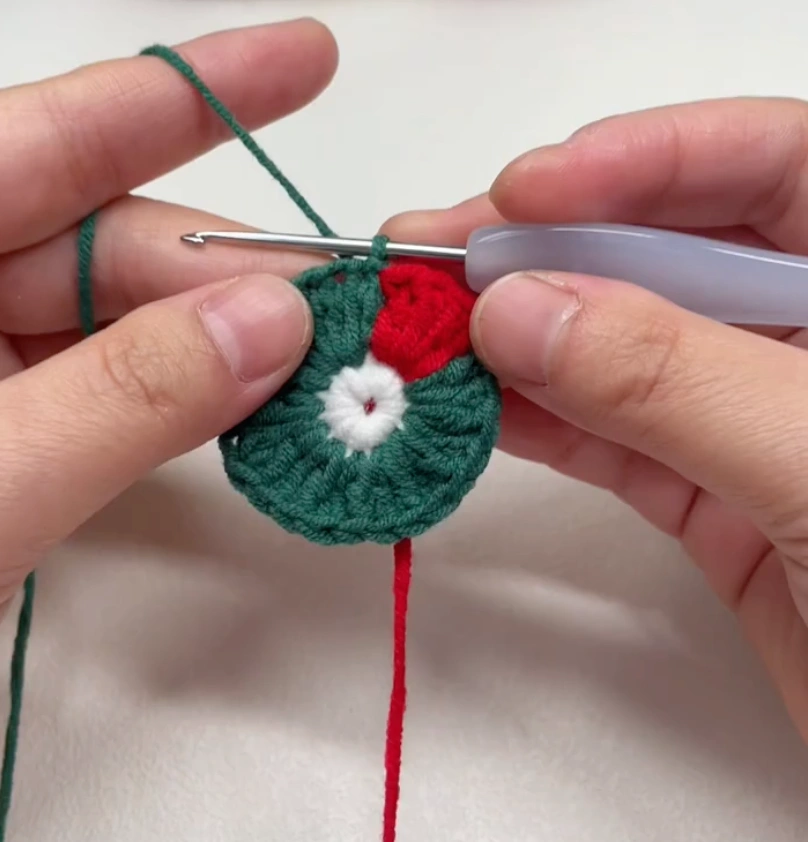
Use green yarn first.
R3: ch 2.
Work the green background:
- (1 dc, dc inc) repeat 11 times.
Change to red.
Work the red hat section:
- (1 dc, dc inc) repeat 2 times.
Change back to green when joining.
Join with a sl st to the first dc of the round.
Stitch count: 39
R4: Make the Hat Body Wider
Use green yarn first.
R4: ch 2.
Work the green background:
- (1 dc, dc inc, 1 dc) repeat 11 times.
Change to red.
Work the red hat section:
- (1 dc, dc inc, 1 dc) repeat 2 times.
Change back to green when joining.
Join with a sl st to the first dc of the round.
Stitch count: 52
This round helps the red section become wider, so the Santa hat starts to look more like a triangle.
R5: Add the White Hat Brim
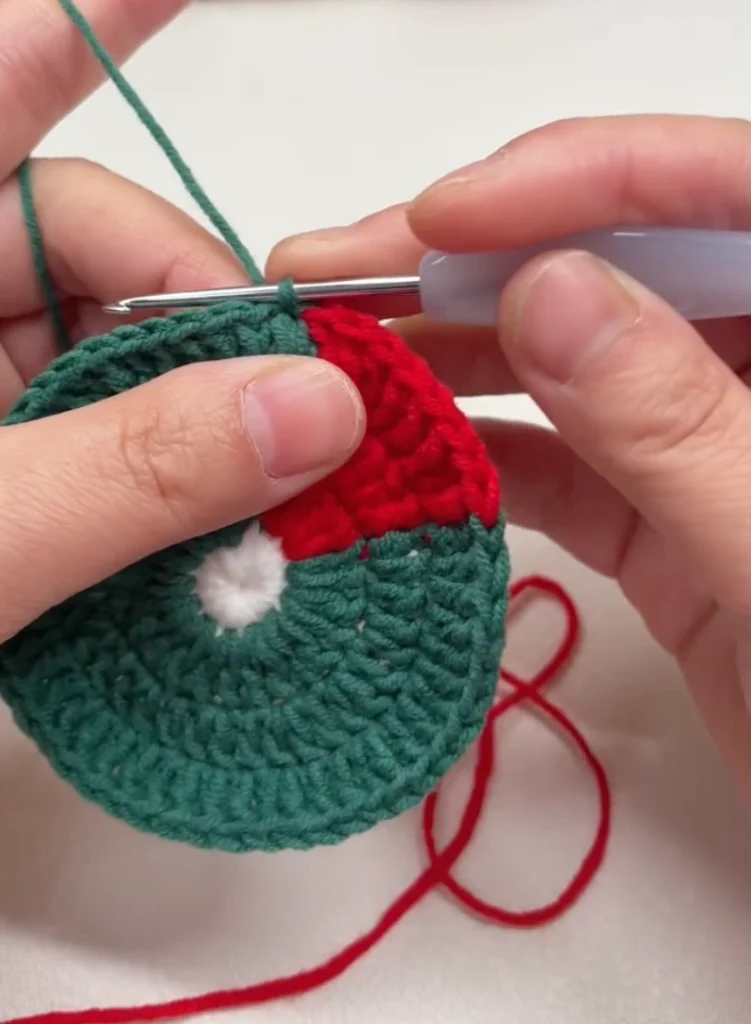
Use green yarn first.
R5: ch 2.
Work the green background:
- (3 dc, dc inc) repeat 11 times.
Change to white.
Work the white hat brim section:
- (3 dc, dc inc) repeat 2 times.
Change back to green when joining.
Join with a sl st to the first dc of the round.
Stitch count: 65
The white section in this round becomes the fluffy brim of the Santa hat.
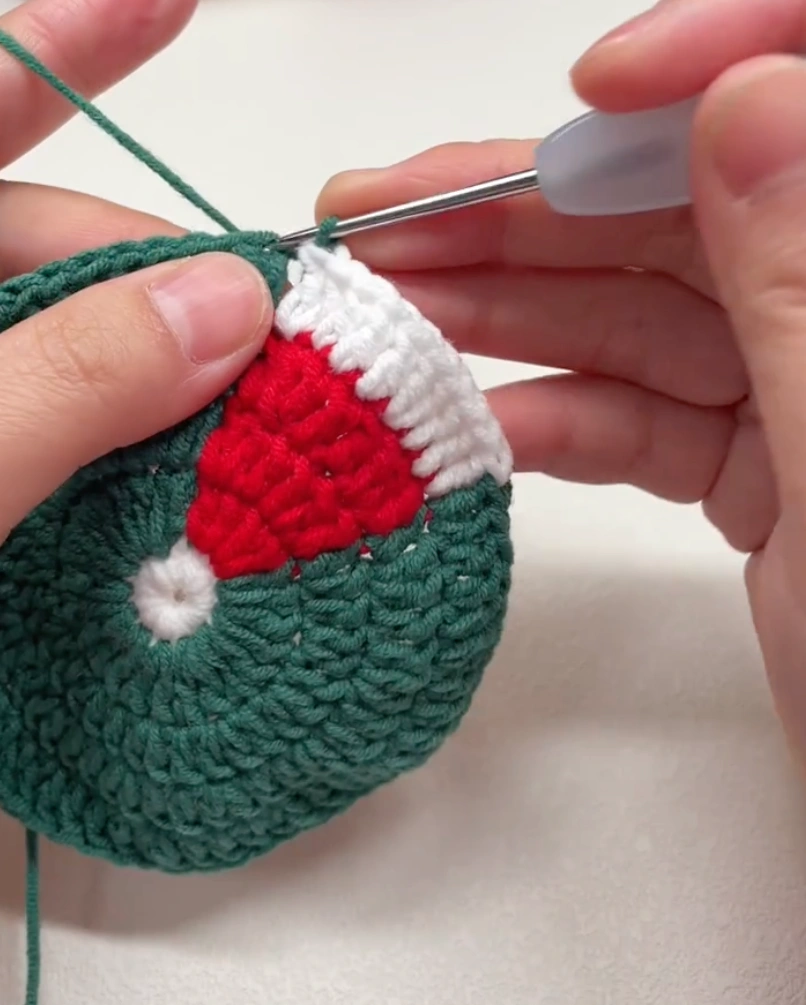
R6: Green Background Round
Use green yarn for the whole round.
R6: ch 2.
Work:
- (2 dc, dc inc, 2 dc) repeat 13 times.
Join with a sl st to the first dc of the round.
Stitch count: 78
This green round helps complete the coaster shape and makes the Santa hat design stand out more clearly.
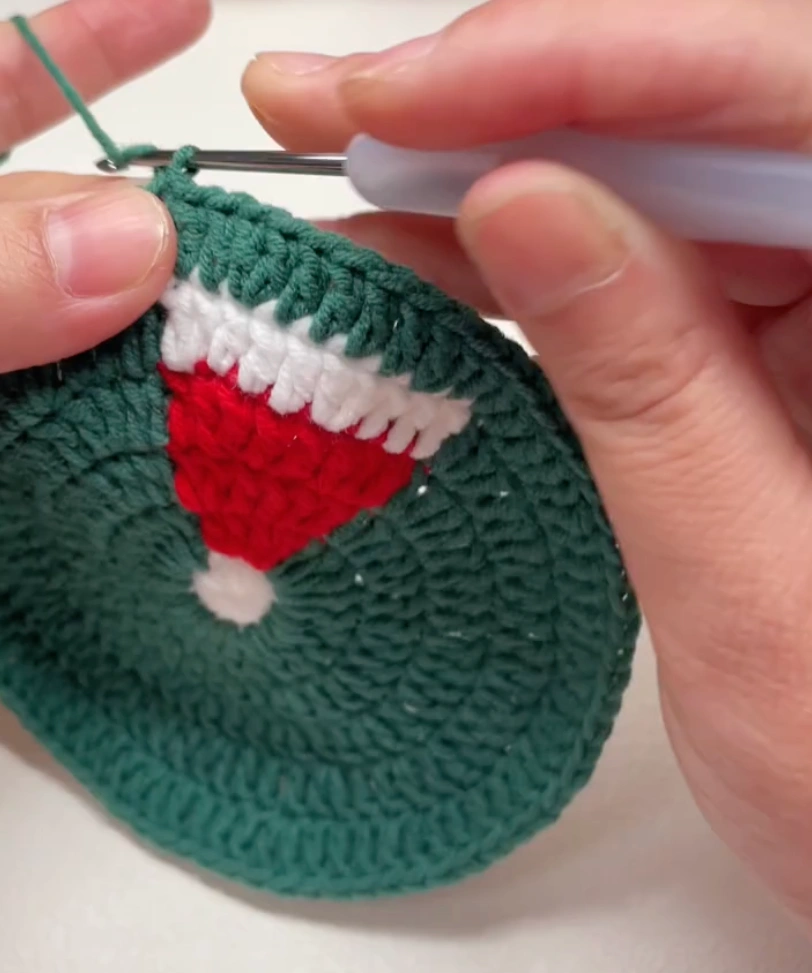
R7: Green Scallop Edging
Use green yarn.
R7: ch 1.
Work 1 sc in the first stitch.
Then repeat the following around:
- skip 2 sts
- work 6 dc in the next st
- skip 2 sts
- work 1 sc in the next st
Continue this pattern all the way around the coaster.
Join with a sl st to the first sc.
Fasten off and weave in the yarn end.
This round creates the soft scalloped edge around the coaster.
You should have 13 scallops around the edge when this round is finished.
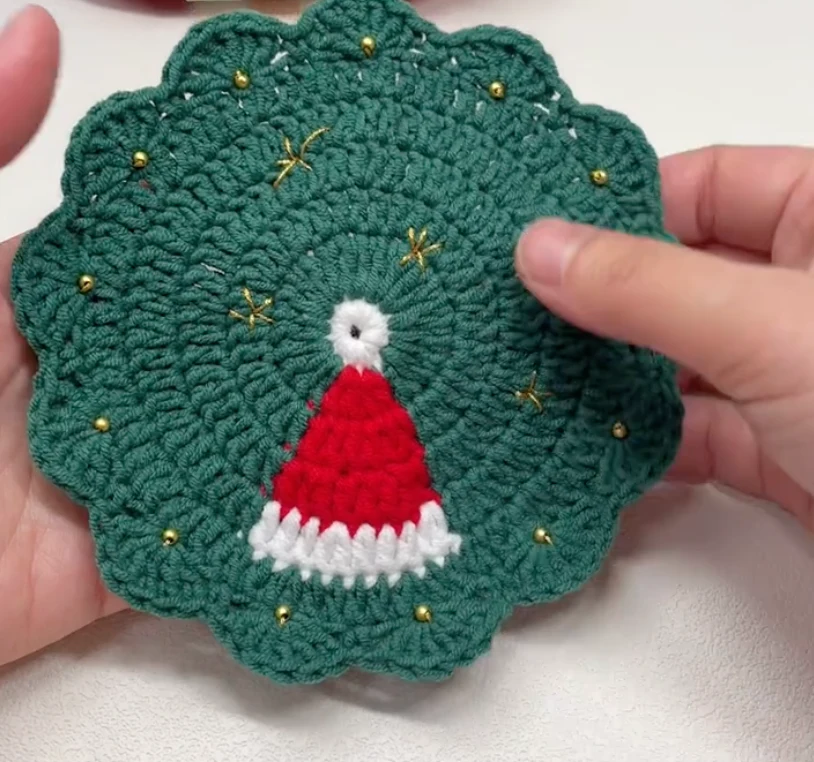
Adding the Gold Details
I add the gold details only after the coaster is finished. I do not crochet them into the rounds, because it is much easier to place them by hand once I can see the full Santa hat shape.
Thread a yarn needle with gold thread and add small decorative stitches on the green background.
You can make simple little star shapes by stitching:
- one small vertical stitch
- one small horizontal stitch across it
- two tiny diagonal stitches
You can also add small gold dots near the scallop edge. If you plan to use the coaster under a cup, I would keep these details flat with thread instead of adding raised beads, so the cup can sit more evenly.
I like to keep the gold details small and scattered. A few little stars and dots are enough to make the coaster feel festive without covering the crochet stitches.
Little Things I Would Watch For
If the Hat Shape Looks Uneven at First
That is normal when you are changing colors in the middle of a round. The most important thing is to keep the red and white sections in the same area each round.
The hat shape does not need to be perfectly sharp. Once the full coaster is finished, the red body, white brim, and white pom-pom will read clearly as a Santa hat.
If Your Coaster Starts Curling
If the coaster curls upward, your tension may be a little tight, or your hook may be too small for the yarn.
Try gently flattening the coaster with your hands after each round. You can also block it lightly after finishing.
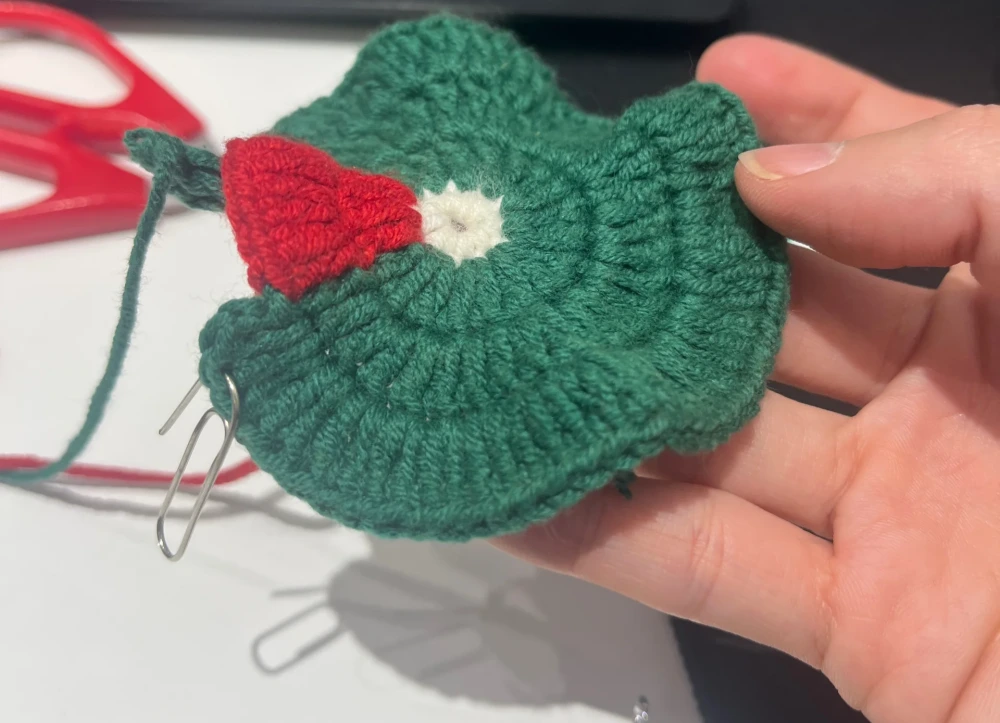
When the Color Changes Look a Bit Messy
When switching colors, try to finish the last step of the stitch with the new color. This makes the color change cleaner.
Also, do not pull the unused yarn too tightly behind the work, or the coaster may pucker.
When the Last Scallop Needs a Tiny Adjustment
The edging works around 78 stitches, so you should get 13 scallops. If your stitch count is off by 1 or 2 stitches, do not panic. You can adjust slightly near the end by skipping one fewer or one extra stitch.
For a coaster like this, a tiny adjustment at the edge is usually not noticeable.
What to Try Next
After making this Christmas hat coaster, I would stay with small flat projects for a little while. They are great for practicing stitch tension, round shaping, and simple finishing details without needing to sew together lots of tiny parts.
For another easy coaster project, you can try my single crochet coaster for beginners. It is simpler than this Christmas version and a nice way to practice making a flat circle.
Since this coaster uses many double crochet stitches, the double crochet for beginners guide is helpful if you want to slow down the stitch itself. And if the increasing rounds felt confusing, my double crochet circle for beginners guide walks through flat circle shaping more gently.
For more small projects to build confidence, you can also browse my beginner-friendly crochet projects collection and choose another piece that feels fun and manageable.